In this tutorial we’ll explain how to convert your raster file to a vector file in Adobe Illustrator before sending it to us for printing use at MAD Monkey Media. Follow along with this article to learn the difference between raster and vector files and how to convert from a raster to a vector. Converting raster to vector can be a simple or complicated task depending on the quality of your starting design or image.
Raster vs Vector
It’s important to understand the difference between a Raster Image and a Vector graphic before we dive into the conversion process.
Raster images are made of pixels or tiny dots of color that produce an image. Each image can have a fixed amount of pixels, which determines the resolution. Zooming into a raster image will cause the pixels to become “fuzzy,” which is often referred to as “pixelated.” Any JPG or PNG image from your camera is considered a raster image.
Download the raster demo files here so you can follow along.

Contrary, vector graphics, which are also known as scalable vector graphics (SVG for short), are graphics that consist of anchor points that are connected by lines and curves. You can think of vectors as those “connect the dot” drawings you may have done as a child. Vector graphics are not based on pixels, which makes them infinitely scalable without ever losing quality.

Here at MAD Monkey Media, we require all uploads to be in a vector format, which allows any print to follow a clean and precise path, leaving you with highly accurate and quality prints. We want to make the process of printing your products online as easy as possible, so we are going to teach you how to convert raster to vector files in Adobe Illustrator for any type of print.
To convert a raster to a vector file, we’ll first need to place or open the raster file in Adobe Illustrator. Follow along with this tutorial to feel confident in all the steps.
5 Steps for Converting Raster to Vector in Illustrator
1. Open your raster file in Illustrator
Without a design file open, we can head to the File dropdown > Open > Select the file > Open.
If you already have an artboard ready, simply head to the File dropdown > Place > Select the file > Place. We then click to place the raster image somewhere on the artboard.
Remember how a raster image is made of pixels? Now’s a good time to try zooming in as far as you can on the sides. Notice how the edges of your image quickly become pixelated. This is what we’re trying to avoid.
2. Use the Image Trace tool
With the image selected, activate the “Image Trace” option. This will trace the contours of your raster image and recreate the geometry with vector points and paths. Head to the Object dropdown > Image Trace > and select Make.
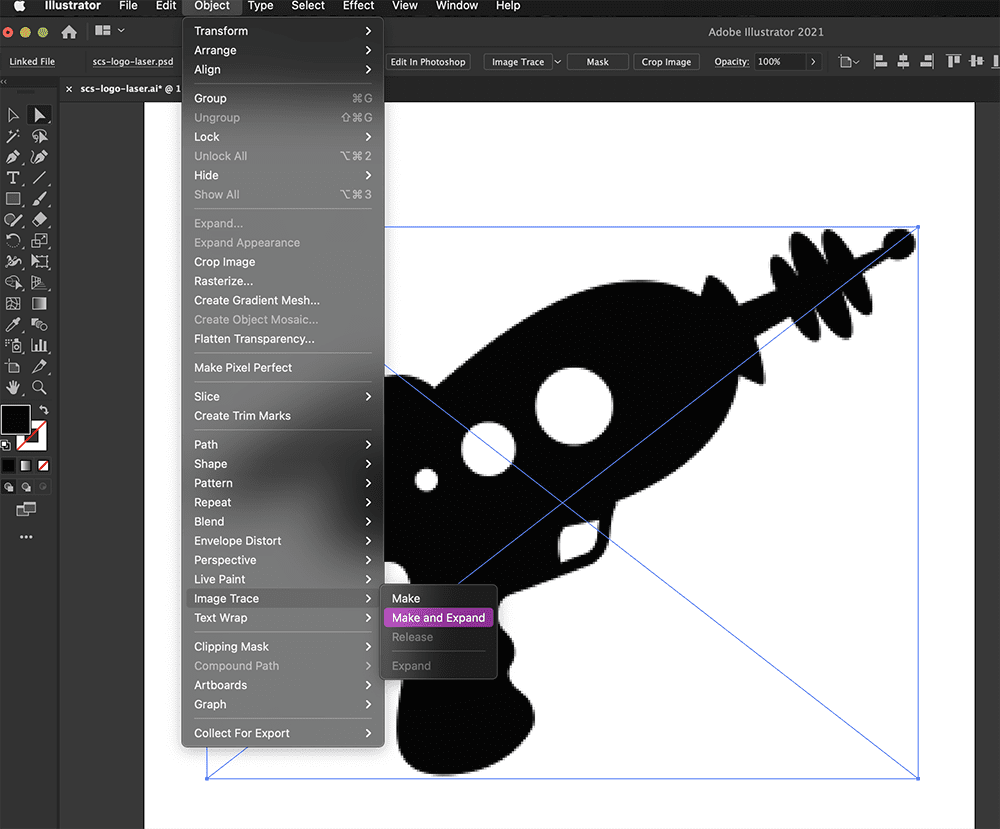
If you zoom in now, you’ll see that the image no longer loses quality as it’s now a vector graphic.
In the Image Trace pane, you’ll find some additional presets that can be used based on the type of raster image you’re converting. Generally, Image Trace works best when images are only a few colors, with the best results coming from silhouettes and images with only one color.
Depending on your file, this may take some experimenting to see the results from each preset.
For now, leave this set to the default preset.
We’ll then want to select “Expand” in the “Image Trace” pane. This option can also be done simultaneously with the Image Trace, from the Image Trace flyout folder. Expanding objects in Illustrator enables you to divide a single object into the multiple objects that make up its appearance. This step is critical to achieving a clean vector graphic.
If you now switch to the Direct Selection Tool in the Tools Panel, or with the keyboard shortcut letter “A,” you will see the anchor points that make up the graphic.
3. Remove interior geometry and negative space
After expanding, you’ll want to remove any interior geometry or negative space. This can be done manually by clearing out the selection, followed by selecting an area of negative space. Notice how the inner circle is selected. We can then hit the Delete key on our keyboard.
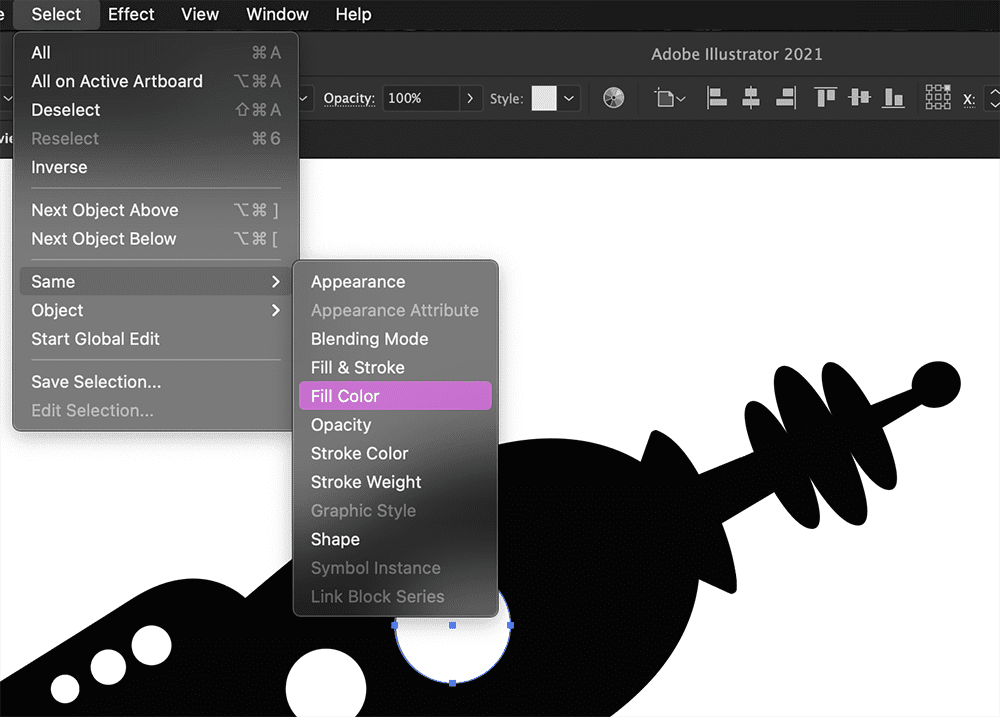
We can delete all negative spaces at once by first selecting one of them with the Direct Selection Tool, followed by Select > Same > Fill Color. This will select all of our negative spaces because they share the same white fill color, then simply hit the Delete key on our keyboard.
4. View your image in Outline mode
Throughout the process, be sure to view your design in the Outline mode. While in outline mode, you should only see the contours to be printed. That will help you catch any unwanted pieces of geometry, which should be deleted.
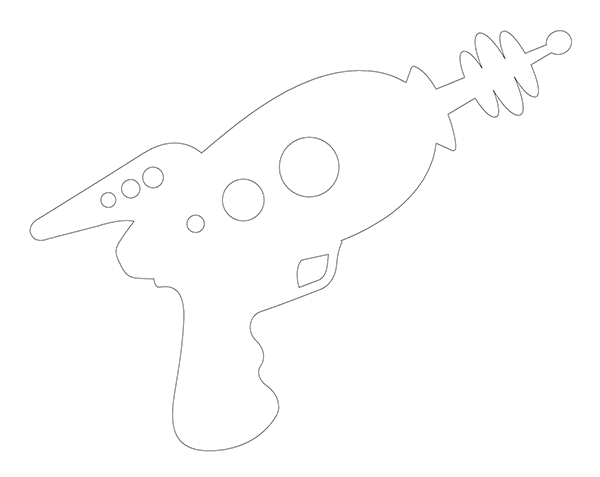
This MAD Monkey Media image is all set and ready for any type of print. However, more complex raster images will not always provide easy results.
Try switching to a more complex raster and Image Trace it to look at the different results.
You’ll find the results of this image trace include a large number of anchor points. This can be problematic for quality printing, especially when many anchor points are close in proximity. In fact, our automated system will reject files that have too many anchor points.
5. Simplify vector paths
We can simplify the vector by first selecting the object and then selecting the Object menu. Scroll down to Path > Simplify. Make sure Live Preview is checked. By just reducing your curve precision slightly you will notice you lose a lot of those points.
You can also refine the other settings to reduce the number of points that make up your design. Just be aware that losing points may affect the dimensions or shape of your design. Keep an eye on your design preview while you continue to tweak the settings.
Lastly, make sure your scale is correct and that your document units are set to inches or millimeters before saving it as an Adobe Illustrator file. Remember that your design is now a vector graphic and can be scaled without losing quality.
Preflight Checklist
Before you upload your design files, be sure to go through our pre-flight checklist for laser cutting:
- File is in a format that we accept (2D: .dxf, .dwg, .ai, .eps .svg; 3D: .step or .stp)
- All holes and cutouts are at least 50% material thickness for laser cut parts
- All holes and cutouts are no less than 0.070” for most waterjet cut parts
- All holes and cutouts are no less than 0.125” for all CNC routed parts
- File is built at a 1:1 scale, preferably in inch or mm units
- All objects are on the same layer
- All stray points, duplicate lines, empty objects and text areas have been removed
- No shapes have open contours
- All shapes have been united, combined or merged
- All text has been converted to outlines or paths
- Cut-out text (reversed text) has bridges or has been stencilized



0 Comments